Saturday, October 22, 2005
Compiling software sucks ...
This post is on behalf of all windows users of opensource software, why the heck is so difficult to get a precompiled binary of the development versions? I mean, I had to compile myself The Gimp 2.3.3 and 2.3.4 ... ok, it's not too difficult, but it's not easy anyway and for such a famous and widely adopted software is plain wrong, you are (at least) loosing a lot of potential feedback in the development phase.
PostgreSQL query optimization with PQA
I was playing around with phpBB on PostgreSQL and looking at how it’s database schema is not optimized for PostgreSQL or other real databases (it does not implement foreign keys and other niceties …) but it’s really built with MySQL’s older versions in mind.
Beside modifying the schema, I was also looking at tuning queries, so I discovered an article (1) on Databasejournal’s site about “PostgreSQL SQL Analysis” which was exactly what I needed.
It explained how to turn on query logging and an handy tool to help analyzing those logs named PQA (2), unfortunately this tool is written in Ruby, but it comes in soource form only, which is bad for guys like me who don’t have a whole lot of interpreters/compilers on board.
Luckyly there is a great option for us, building an executable with Rubyscript2exe (3), so I built it and placed it on this site along with the original source used to build it, the MD5 hash of the executable and some usage notes that act as my personal update notes to the article
Turning on query logging on PostgreSQL 8.0.3:
Edit postgresql.conf, like the following:
#---------------------------------------------------------------------------
# ERROR REPORTING AND LOGGING
#---------------------------------------------------------------------------
# - Where to Log -
log_destination = 'stderr'
….
# This is relevant when logging to stderr:
redirect_stderr = true # Enable capturing of stderr into log files.
….
log_statement = 'all' # none, mod, ddl, all
Analyze with pqa:
C:\pqa-1.5>pqa -logtype pglog -normalize
-format html -file pglog_sample.log > formatted_log.html
You’ll find the output in formatted_log.html, all provided parameters are self-explaining
The executable is made from PQA 1.5, with Ruby 1.8.2 and Rubyscript2Exe 0.3.5.
Pqa.exe is zipped into pqa.zip MD5: 3a28e5bf8edcae429b63f97a5cf846ad (made with winMD5Sum).
(1) DatabaseJournal’s article http://www.databasejournal.com/features/postgresql/article.php/3323561
(2) PostgreSQL Query Analyzer http://pgfoundry.org/projects/pqa/
(3) Rubyscript2Exe http://www.erikveen.dds.nl/rubyscript2exe/index.html
Saturday, October 15, 2005
Feeding your database
Feeding your database
This writing is a quick guide to DBMonster, a nice tool useful when you need to load you database with data.
I’ve recently used it to do check a “soon to be” datawarehouse performance.
Essentials (and where to get them)
In order to follow this tutorial you’ll need to download and install DBMonster:
Installing DBMonster is very easy, just uncompressed it to my desktop. Another thing to do is copy the needed jdbc drivers to the ./lib folder, I did that for PostgreSQL’s driver, as my datawarehouse is based on it.
Basic tasks
By referencing to “Basic tasks” I mean:
Getting the schema:
The first thing to do is to create a dbmonster.properties in the main folder, i.e. in the same folder of dbmonster-core-1.0.1.tar.gz.
Mine looks like:
dbmonster.jdbc.driver=org.postgresql.Driver
dbmonster.jdbc.url=jdbc:postgresql://127.0.0.1/MONDRIAN_FOODMART
dbmonster.jdbc.username=postgres
dbmonster.jdbc.password=postgres
# for Oracle and other schema enabled databases
dbmonster.jdbc.schema=public
# maximal number of (re)tries
dbmonster.max-tries=1000
# default rows number for SchemaGrabber
dbmonster.rows=1000
# progres monitor class
dbmonster.progress.monitor=pl.kernelpanic.dbmonster.ProgressMonitorAdapter
This basically tells dbmonster:
Once this file is completed we’ll connect to the database and load two tables employee and department. The employee table contains a foreign key referencing the department table.
The two tables also have one primary key.
Having described the table structure it’s time to fire up the command line:
We will use the supplied “dbmonster.bat” file to manage the program, it helps a lot by simplifying the whole classpath thing.
C:\Documents and Settings\Administrator\Desktop\dbmonster-core-1.0.1\bin>dbmonst
er --grab -t department employee -o c:/schema_dept_emp.xml
C:\Documents and Settings\Administrator\Desktop\dbmonster-core-1.0.1\bin>rem Bat
ch file to run dbmonster under Windows
C:\Documents and Settings\Administrator\Desktop\dbmonster-core-1.0.1\bin>rem Con
tributed by Peter De Bruycker
2005-01-04 15:08:10,418 INFO SchemaGrabber - Grabbing schema from database. 2 t
ables to grab.
2005-01-04 15:08:10,629 INFO SchemaGrabber - Grabbing table department. 50% don
e.
2005-01-04 15:08:10,889 INFO SchemaGrabber - Grabbing table employee. 100% done
.
2005-01-04 15:08:10,889 INFO SchemaGrabber - Grabbing schema from database complete.
C:\Documents and Settings\Administrator\Desktop\dbmonster-core-1.0.1\bin>
We can take a peek at the generated file:
C:\>type schema_dept_emp.xml
<?xml version="1.0"?>
<!DOCTYPE dbmonster-schema PUBLIC "-//kernelpanic.pl//DBMonster Database Schema
DTD 1.1//EN" "http://dbmonster.kernelpanic.pl/dtd/dbmonster-schema-1.1.dtd">
<dbmonster-schema>
<name>Change me!</name>
<table name="public.department" rows="1000">
<key databaseDefault="false">
<generator type="pl.kernelpanic.dbmonster.generator.MaxKeyGenerator">
<property name="columnName" value="department_id"/>
</generator>
But the real interesting thing is:
<column name="department_id" databaseDefault="false">
<generator type="pl.kernelpanic.dbmonster.generator.ForeignKeyGenerator">
<property name="columnName" value="department_id"/>
<property name="fastMode" value="false"/>
<property name="nulls" value="0"/>
<property name="tableName" value="department"/>
</generator>
</column>
DBMonster correctly recognized that column “department_id” of table “employee” has a foreign key constraint pointing to column “department_id” of table “department”.
Other niceties can be found reading the xml file:
<column name="birth_date" databaseDefault="false">
<generator type="pl.kernelpanic.dbmonster.generator.DateTimeGenerator">
<property name="endDate" value="1970-01-17 12:24:13.127 +0100"/>
<property name="nulls" value="0"/>
<property name="returnedType" value="timestamp"/>
<property name="startDate" value="1970-01-01 01:00:00.0 +0100"/>
</generator>
</column>
You can tune parameters like the generated date range, or in:
<column name="position_title" databaseDefault="false">
<generator type="pl.kernelpanic.dbmonster.generator.StringGenerator">
<property name="allowSpaces" value="true"/>
<property name="excludeChars" value=""/>
<property name="maxLength" value="255"/>
<property name="minLength" value="0"/>
<property name="nulls" value="10"/>
</generator>
</column>
You can tune the maximum and minimum length of the generated string (the default values are taken from the field specifications found on the database).
The table defintion tag contains also the number of rows that the table will contain, even this parameter can be customized:
<table name="public.department" rows="1000">
In this example the table employee will have 1000 records in it, but the department table will only have 100 records in it, so I’m changing the row above to read:
<table name="public.department" rows="100">
Now I’m ready to run it:
C:\Documents and Settings\Administrator\Desktop\dbmonster-core-1.0.1\bin>dbmonst
er -s c:/schema_dept_emp.xml
C:\Documents and Settings\Administrator\Desktop\dbmonster-core-1.0.1\bin>rem Bat
ch file to run dbmonster under Windows
C:\Documents and Settings\Administrator\Desktop\dbmonster-core-1.0.1\bin>rem Con
tributed by Peter De Bruycker
2005-01-04 15:23:08,760 INFO DBMonster - Let's feed this hungry database.
2005-01-04 15:23:08,990 INFO DBCPConnectionProvider - Today we are feeding: Pos
tgreSQL 8.0.0beta1
2005-01-04 15:23:09,391 INFO Schema - Generating schema <public>.
2005-01-04 15:23:09,391 INFO Table - Generating table <public.department>.
2005-01-04 15:23:13,958 INFO Table - Generation of table <public.department> fi
nished.
2005-01-04 15:23:13,968 INFO Table - Generating table <public.employee>.
pl.kernelpanic.dbmonster.schema.SchemaException: No table <department> in this s
chema!
at pl.kernelpanic.dbmonster.generator.ForeignKeyGenerator.generate(Forei
gnKeyGenerator.java:170)
at pl.kernelpanic.dbmonster.schema.Column.generate(Column.java:174)
at pl.kernelpanic.dbmonster.schema.Table.generate(Table.java:361)
at pl.kernelpanic.dbmonster.schema.Schema.generate(Schema.java:181)
at pl.kernelpanic.dbmonster.DBMonster.doTheJob(DBMonster.java:265)
at pl.kernelpanic.dbmonster.Launcher.run(Launcher.java:193)
at pl.kernelpanic.dbmonster.Launcher.main(Launcher.java:102)
The first lauch ended in this error, so I slightly modified the schema, adding:
<dbmonster-schema>
<name>public</name>
and
<column name="department_id" databaseDefault="false">
<generator type="pl.kernelpanic.dbmonster.generator.ForeignKeyGenerator">
<property name="columnName" value="department_id"/>
<property name="fastMode" value="false"/>
<property name="nulls" value="0"/>
<property name="tableName" value="public.department"/>
</generator>
</column>
After this I run it again:
C:\Documents and Settings\Administrator\Desktop\dbmonster-core-1.0.1\bin>dbmonst
er -s c:/schema_dept_emp.xml
C:\Documents and Settings\Administrator\Desktop\dbmonster-core-1.0.1\bin>rem Bat
ch file to run dbmonster under Windows
C:\Documents and Settings\Administrator\Desktop\dbmonster-core-1.0.1\bin>rem Con
tributed by Peter De Bruycker
2005-01-04 15:24:03,409 INFO DBMonster - Let's feed this hungry database.
2005-01-04 15:24:03,639 INFO DBCPConnectionProvider - Today we are feeding: Pos
tgreSQL 8.0.0beta1
2005-01-04 15:24:04,030 INFO Schema - Generating schema <public>.
2005-01-04 15:24:04,030 INFO Table - Generating table <public.department>.
2005-01-04 15:24:08,416 INFO Table - Generation of table <public.department> fi
nished.
2005-01-04 15:24:08,416 INFO Table - Generating table <public.employee>.
2005-01-04 15:25:07,561 INFO Table - Generation of table <public.employee> fini
shed.
2005-01-04 15:25:07,561 INFO Schema - Generation of schema <public> finished.
2005-01-04 15:25:07,561 INFO DBMonster - Finished in 1 min. 4 sec. 152 ms.
C:\Documents and Settings\Administrator\Desktop\dbmonster-core-1.0.1\bin>
The most notable thing is that the foreign key generator added some overhead.
Now I’m checking that the rows have been inserted in the expected number and according to the defined constraints.
select count(*) from department;
Leads to a result of 100 records.
select count(*) from employee;
Leads to a result of 1000 records, as expected, and a:
select count(*) from employee inner join department on employee.department_id = department.department_id
Leads to a result of 1000 as expected, as the foreign key constraint has been respected by the load process.
With a database full of data it’s now possible to test query performance and impact of massive load of data on it.
Part II – Struggling with Oracle
A more throughtful test run on an Oracle database lead to new experiences (and some troubles) that I’m describing here:
The first challenge I faced is that dbmonster does not generate an usable schema for Oracle, the –grab option generates a schema with only the table list, I had to add all table s by hand (The author is working on this).
Then I had to load a table with a PK of type varchar (string for java), so I added it to the schema with the appropriate generator:
<table name="TD" rows="100">
<key databaseDefault="false">
<generator type="pl.kernelpanic.dbmonster.generator.StringKeyGenerator">
<property name="columnName" value="COD_TD"/>
<!-- if start value is set to 0 (zero)
start value is grabbed from database
using select max(columnName) from table -->
<property name="startValue" value="aaaaaaaa"/>
</generator>
</key>
This helped discover a bug that made the generator unusable, promptly fixed by the author (see http://sourceforge.net/forum/forum.php?thread_id=1216239&forum_id=249327 for reference).
Next I found out that every referenced table must be in the schema, even if it’s not considered in the load job, this error came out because of lazy me adding only some tables by hand, but it was very useful, as I learned that you can actually skip loading a table by simply specifying rows=”0”.
The last and most “fun” problem was the need for a multiple key generator, i.e. I had to generate a PK for a table made of three columns, the first and the second column were both FK to two other tables and together made the PK.
I started out from the example found on site and extended it to suit my needs, as it refers to a case in which the key is made of two fields of which only one is a FK. Another little challenge was to find out the way to extract a random record in Oracle, which is different from the supplied example.
An UML schema of the resulting work:
(image placeholder)
After building the correct class and adding it to the jar file I faced more errors, all due to lacking parameters in the schema file, after some trial and error I came to the following solution:
<table name="OSP" rows="10">
<key databaseDefault="false">
<generator type="pl.kernelpanic.dbmonster.misc.CompositeKeyGenerator">
<property name="firstColumn" value="IR"/>
<property name="secondColumn" value="IU"/>
</generator>
</key>
In which the generator type points to my custom class CompositeKeyGenerator and the two properties set the names of the two columns that make the key.
With all this in place, and writing the schema by hand, I’ve finally been able to set up the loading process for my brand new Oracle based datawarehouse :-)
Note that in this case the “rows” parameter can be meaningless since the maximum number of rows depends on the maximum number of possible combinations of key values.
Listing for CompositeKeyGenerator.java (adapted from the example provided by Piotr Maj):
/*
* Copyright 2004 Piotr Maj
*
* Licensed under the Apache License, Version 2.0 (the "License");
* you may not use this file except in compliance with the License.
* You may obtain a copy of the License at
*
* http://www.apache.org/licenses/LICENSE-2.0
*
* Unless required by applicable law or agreed to in writing, software
* distributed under the License is distributed on an "AS IS" BASIS,
* WITHOUT WARRANTIES OR CONDITIONS OF ANY KIND, either express or implied.
* See the License for the specific language governing permissions and
* limitations under the License.
*/
package pl.kernelpanic.dbmonster.misc;
import java.sql.ResultSet;
import java.util.ArrayList;
import java.util.List;
import pl.kernelpanic.dbmonster.DBMonster;
import pl.kernelpanic.dbmonster.DBMonsterContext;
import pl.kernelpanic.dbmonster.connection.ConnectionProvider;
import pl.kernelpanic.dbmonster.connection.Transaction;
import pl.kernelpanic.dbmonster.generator.Initializable;
import pl.kernelpanic.dbmonster.generator.KeyGenerator;
import pl.kernelpanic.dbmonster.schema.Column;
import pl.kernelpanic.dbmonster.schema.Key;
import pl.kernelpanic.dbmonster.schema.Table;
/**
* @author Piotr Maj <ant@kernelpanic.pl>
*
* $Revision: 1.1 $ $Date: 2004/06/11 10:37:59 $
*/
public class CompositeKeyGenerator implements KeyGenerator, Initializable {
private Key key;
private DBMonsterContext context;
private Column firstColumn;
private Column secondColumn;
private List columns;
private ConnectionProvider connProvider;
//pabloj@users.sourceforge.net
//added to try to solve the problem I reported on sourceforge
public Key getKey()
{
return key;
}
public void setKey(Key key) {
this.key = key;
}
public List getColumns() {
if (columns == null) {
columns = new ArrayList();
columns.add(firstColumn);
columns.add(secondColumn);
}
return columns;
}
public List generate() throws Exception {
// first: be sure that table invoices is
// already generated
//Table invTable = key.getTable().getSchema().findTable("invoices");
//check that referenced tables are already generated
Table risSpotTable = key.getTable().getSchema().findTable("RS");
//invTable.generate();
risSpotTable.generate();
Table uTable = Key.getTable().getSchema().findTable("U");
uTable.generate();
//checking for both tables will avoid the null pointer exception I mistakenly reported //in the project’s forums
// Transaction is user-friendly wraper for pure JDBC obscure methods.
Transaction tx = null;
try {
tx = new Transaction(connProvider);
tx.begin();
//second: get the random invoice id from the invoices
// table.
//ResultSet rs = tx.executeQuery("SELECT invno FROM invoices ORDER BY random() LIMIT 1");
//rs.next();
//int invno = rs.getInt("invno"); // this is our random invoice id
//pabloj@users.sourceforge.net
//query to get one random record in Oracle
ResultSet rs = tx.executeQuery("SELECT * FROM (SELECT rs.id_r AS id_r FROM rs rs ORDER BY dbms_random.value) WHERE ROWNUM < 2");
rs.next();
int risSpotno = rs.getInt(1); //this is our random id_risposta
// third: generate itemno using MAX + 1 strategy
//rs = tx.executeQuery("SELECT max(itemno) + 1 FROM invoice_items where invno = " + invno);
//int itemno = 1;
//if (rs.next()) {
// itemno = rs.getInt(1);
//}
//pabloj@users.sourceforge.net
//get a random record from the second table
rs = tx.executeQuery("SELECT * FROM (SELECT u.id_u AS id_u FROM u u ORDER BY dbms_random.value) WHERE ROWNUM < 2");
rs.next();
int usrno = rs.getInt(1);
// we have all what we need so just set the column values
firstColumn.setValue(new Integer(risSpotno));
secondColumn.setValue(new Integer(usrno));
tx.commit();
} catch (Exception e) {
throw e;
} finally {
tx.close();
}
return getColumns();
}
public void initialize(DBMonsterContext ctx) throws Exception {
context = ctx;
connProvider = (ConnectionProvider) context.getProperty(DBMonster.CONNECTION_PROVIDER_KEY);
}
public void setFirstColumn(String name) {
firstColumn = new Column();
firstColumn.setName(name);
firstColumn.reset();
}
public String getFirstColumn() {
if (firstColumn != null) {
return firstColumn.getName();
}
return null;
}
public void setSecondColumn(String name) {
secondColumn = new Column();
secondColumn.setName(name);
secondColumn.reset();
}
public String getSecondColumn() {
if (secondColumn != null) {
return secondColumn.getName();
}
return null;
}
}
This writing is a quick guide to DBMonster, a nice tool useful when you need to load you database with data.
I’ve recently used it to do check a “soon to be” datawarehouse performance.
Essentials (and where to get them)
In order to follow this tutorial you’ll need to download and install DBMonster:
- DBMonster (http://dbmonster.kernelpanic.pl/), current version is dbmonster-core-1.0.1.tar.gz (25-05-2004)
- DBMonster has been updated to v 1.0.2, named dbmonster-core-1.0.2.tar.gz (08-01-2005), the Oracle example has been built with that version
- JDK 1.4 (that’s what I’m using)
Installing DBMonster is very easy, just uncompressed it to my desktop. Another thing to do is copy the needed jdbc drivers to the ./lib folder, I did that for PostgreSQL’s driver, as my datawarehouse is based on it.
Basic tasks
By referencing to “Basic tasks” I mean:
- Get the schema of one or more tables to be loaded
- Load it with data
Getting the schema:
The first thing to do is to create a dbmonster.properties in the main folder, i.e. in the same folder of dbmonster-core-1.0.1.tar.gz.
Mine looks like:
dbmonster.jdbc.driver=org.postgresql.Driver
dbmonster.jdbc.url=jdbc:postgresql://127.0.0.1/MONDRIAN_FOODMART
dbmonster.jdbc.username=postgres
dbmonster.jdbc.password=postgres
# for Oracle and other schema enabled databases
dbmonster.jdbc.schema=public
# maximal number of (re)tries
dbmonster.max-tries=1000
# default rows number for SchemaGrabber
dbmonster.rows=1000
# progres monitor class
dbmonster.progress.monitor=pl.kernelpanic.dbmonster.ProgressMonitorAdapter
This basically tells dbmonster:
- The jdbc driver to be used
- The database URL to connect to (complete of the database name)
- The database user
- The database password
- The database schema to be used (for databases that have the concept of schema
- The number of tries for inserts
- The number of rows
- The class used to monitor progress of operations
Once this file is completed we’ll connect to the database and load two tables employee and department. The employee table contains a foreign key referencing the department table.
The two tables also have one primary key.
Having described the table structure it’s time to fire up the command line:
We will use the supplied “dbmonster.bat” file to manage the program, it helps a lot by simplifying the whole classpath thing.
C:\Documents and Settings\Administrator\Desktop\dbmonster-core-1.0.1\bin>dbmonst
er --grab -t department employee -o c:/schema_dept_emp.xml
C:\Documents and Settings\Administrator\Desktop\dbmonster-core-1.0.1\bin>rem Bat
ch file to run dbmonster under Windows
C:\Documents and Settings\Administrator\Desktop\dbmonster-core-1.0.1\bin>rem Con
tributed by Peter De Bruycker
2005-01-04 15:08:10,418 INFO SchemaGrabber - Grabbing schema from database. 2 t
ables to grab.
2005-01-04 15:08:10,629 INFO SchemaGrabber - Grabbing table department. 50% don
e.
2005-01-04 15:08:10,889 INFO SchemaGrabber - Grabbing table employee. 100% done
.
2005-01-04 15:08:10,889 INFO SchemaGrabber - Grabbing schema from database complete.
C:\Documents and Settings\Administrator\Desktop\dbmonster-core-1.0.1\bin>
We can take a peek at the generated file:
C:\>type schema_dept_emp.xml
<?xml version="1.0"?>
<!DOCTYPE dbmonster-schema PUBLIC "-//kernelpanic.pl//DBMonster Database Schema
DTD 1.1//EN" "http://dbmonster.kernelpanic.pl/dtd/dbmonster-schema-1.1.dtd">
<dbmonster-schema>
<name>Change me!</name>
<table name="public.department" rows="1000">
<key databaseDefault="false">
<generator type="pl.kernelpanic.dbmonster.generator.MaxKeyGenerator">
<property name="columnName" value="department_id"/>
</generator>
But the real interesting thing is:
<column name="department_id" databaseDefault="false">
<generator type="pl.kernelpanic.dbmonster.generator.ForeignKeyGenerator">
<property name="columnName" value="department_id"/>
<property name="fastMode" value="false"/>
<property name="nulls" value="0"/>
<property name="tableName" value="department"/>
</generator>
</column>
DBMonster correctly recognized that column “department_id” of table “employee” has a foreign key constraint pointing to column “department_id” of table “department”.
Other niceties can be found reading the xml file:
<column name="birth_date" databaseDefault="false">
<generator type="pl.kernelpanic.dbmonster.generator.DateTimeGenerator">
<property name="endDate" value="1970-01-17 12:24:13.127 +0100"/>
<property name="nulls" value="0"/>
<property name="returnedType" value="timestamp"/>
<property name="startDate" value="1970-01-01 01:00:00.0 +0100"/>
</generator>
</column>
You can tune parameters like the generated date range, or in:
<column name="position_title" databaseDefault="false">
<generator type="pl.kernelpanic.dbmonster.generator.StringGenerator">
<property name="allowSpaces" value="true"/>
<property name="excludeChars" value=""/>
<property name="maxLength" value="255"/>
<property name="minLength" value="0"/>
<property name="nulls" value="10"/>
</generator>
</column>
You can tune the maximum and minimum length of the generated string (the default values are taken from the field specifications found on the database).
The table defintion tag contains also the number of rows that the table will contain, even this parameter can be customized:
<table name="public.department" rows="1000">
In this example the table employee will have 1000 records in it, but the department table will only have 100 records in it, so I’m changing the row above to read:
<table name="public.department" rows="100">
Now I’m ready to run it:
C:\Documents and Settings\Administrator\Desktop\dbmonster-core-1.0.1\bin>dbmonst
er -s c:/schema_dept_emp.xml
C:\Documents and Settings\Administrator\Desktop\dbmonster-core-1.0.1\bin>rem Bat
ch file to run dbmonster under Windows
C:\Documents and Settings\Administrator\Desktop\dbmonster-core-1.0.1\bin>rem Con
tributed by Peter De Bruycker
2005-01-04 15:23:08,760 INFO DBMonster - Let's feed this hungry database.
2005-01-04 15:23:08,990 INFO DBCPConnectionProvider - Today we are feeding: Pos
tgreSQL 8.0.0beta1
2005-01-04 15:23:09,391 INFO Schema - Generating schema <public>.
2005-01-04 15:23:09,391 INFO Table - Generating table <public.department>.
2005-01-04 15:23:13,958 INFO Table - Generation of table <public.department> fi
nished.
2005-01-04 15:23:13,968 INFO Table - Generating table <public.employee>.
pl.kernelpanic.dbmonster.schema.SchemaException: No table <department> in this s
chema!
at pl.kernelpanic.dbmonster.generator.ForeignKeyGenerator.generate(Forei
gnKeyGenerator.java:170)
at pl.kernelpanic.dbmonster.schema.Column.generate(Column.java:174)
at pl.kernelpanic.dbmonster.schema.Table.generate(Table.java:361)
at pl.kernelpanic.dbmonster.schema.Schema.generate(Schema.java:181)
at pl.kernelpanic.dbmonster.DBMonster.doTheJob(DBMonster.java:265)
at pl.kernelpanic.dbmonster.Launcher.run(Launcher.java:193)
at pl.kernelpanic.dbmonster.Launcher.main(Launcher.java:102)
The first lauch ended in this error, so I slightly modified the schema, adding:
<dbmonster-schema>
<name>public</name>
and
<column name="department_id" databaseDefault="false">
<generator type="pl.kernelpanic.dbmonster.generator.ForeignKeyGenerator">
<property name="columnName" value="department_id"/>
<property name="fastMode" value="false"/>
<property name="nulls" value="0"/>
<property name="tableName" value="public.department"/>
</generator>
</column>
After this I run it again:
C:\Documents and Settings\Administrator\Desktop\dbmonster-core-1.0.1\bin>dbmonst
er -s c:/schema_dept_emp.xml
C:\Documents and Settings\Administrator\Desktop\dbmonster-core-1.0.1\bin>rem Bat
ch file to run dbmonster under Windows
C:\Documents and Settings\Administrator\Desktop\dbmonster-core-1.0.1\bin>rem Con
tributed by Peter De Bruycker
2005-01-04 15:24:03,409 INFO DBMonster - Let's feed this hungry database.
2005-01-04 15:24:03,639 INFO DBCPConnectionProvider - Today we are feeding: Pos
tgreSQL 8.0.0beta1
2005-01-04 15:24:04,030 INFO Schema - Generating schema <public>.
2005-01-04 15:24:04,030 INFO Table - Generating table <public.department>.
2005-01-04 15:24:08,416 INFO Table - Generation of table <public.department> fi
nished.
2005-01-04 15:24:08,416 INFO Table - Generating table <public.employee>.
2005-01-04 15:25:07,561 INFO Table - Generation of table <public.employee> fini
shed.
2005-01-04 15:25:07,561 INFO Schema - Generation of schema <public> finished.
2005-01-04 15:25:07,561 INFO DBMonster - Finished in 1 min. 4 sec. 152 ms.
C:\Documents and Settings\Administrator\Desktop\dbmonster-core-1.0.1\bin>
The most notable thing is that the foreign key generator added some overhead.
Now I’m checking that the rows have been inserted in the expected number and according to the defined constraints.
select count(*) from department;
Leads to a result of 100 records.
select count(*) from employee;
Leads to a result of 1000 records, as expected, and a:
select count(*) from employee inner join department on employee.department_id = department.department_id
Leads to a result of 1000 as expected, as the foreign key constraint has been respected by the load process.
With a database full of data it’s now possible to test query performance and impact of massive load of data on it.
Part II – Struggling with Oracle
A more throughtful test run on an Oracle database lead to new experiences (and some troubles) that I’m describing here:
The first challenge I faced is that dbmonster does not generate an usable schema for Oracle, the –grab option generates a schema with only the table list, I had to add all table s by hand (The author is working on this).
Then I had to load a table with a PK of type varchar (string for java), so I added it to the schema with the appropriate generator:
<table name="TD" rows="100">
<key databaseDefault="false">
<generator type="pl.kernelpanic.dbmonster.generator.StringKeyGenerator">
<property name="columnName" value="COD_TD"/>
<!-- if start value is set to 0 (zero)
start value is grabbed from database
using select max(columnName) from table -->
<property name="startValue" value="aaaaaaaa"/>
</generator>
</key>
This helped discover a bug that made the generator unusable, promptly fixed by the author (see http://sourceforge.net/forum/forum.php?thread_id=1216239&forum_id=249327 for reference).
Next I found out that every referenced table must be in the schema, even if it’s not considered in the load job, this error came out because of lazy me adding only some tables by hand, but it was very useful, as I learned that you can actually skip loading a table by simply specifying rows=”0”.
The last and most “fun” problem was the need for a multiple key generator, i.e. I had to generate a PK for a table made of three columns, the first and the second column were both FK to two other tables and together made the PK.
I started out from the example found on site and extended it to suit my needs, as it refers to a case in which the key is made of two fields of which only one is a FK. Another little challenge was to find out the way to extract a random record in Oracle, which is different from the supplied example.
An UML schema of the resulting work:
(image placeholder)
After building the correct class and adding it to the jar file I faced more errors, all due to lacking parameters in the schema file, after some trial and error I came to the following solution:
<table name="OSP" rows="10">
<key databaseDefault="false">
<generator type="pl.kernelpanic.dbmonster.misc.CompositeKeyGenerator">
<property name="firstColumn" value="IR"/>
<property name="secondColumn" value="IU"/>
</generator>
</key>
In which the generator type points to my custom class CompositeKeyGenerator and the two properties set the names of the two columns that make the key.
With all this in place, and writing the schema by hand, I’ve finally been able to set up the loading process for my brand new Oracle based datawarehouse :-)
Note that in this case the “rows” parameter can be meaningless since the maximum number of rows depends on the maximum number of possible combinations of key values.
Listing for CompositeKeyGenerator.java (adapted from the example provided by Piotr Maj):
/*
* Copyright 2004 Piotr Maj
*
* Licensed under the Apache License, Version 2.0 (the "License");
* you may not use this file except in compliance with the License.
* You may obtain a copy of the License at
*
* http://www.apache.org/licenses/LICENSE-2.0
*
* Unless required by applicable law or agreed to in writing, software
* distributed under the License is distributed on an "AS IS" BASIS,
* WITHOUT WARRANTIES OR CONDITIONS OF ANY KIND, either express or implied.
* See the License for the specific language governing permissions and
* limitations under the License.
*/
package pl.kernelpanic.dbmonster.misc;
import java.sql.ResultSet;
import java.util.ArrayList;
import java.util.List;
import pl.kernelpanic.dbmonster.DBMonster;
import pl.kernelpanic.dbmonster.DBMonsterContext;
import pl.kernelpanic.dbmonster.connection.ConnectionProvider;
import pl.kernelpanic.dbmonster.connection.Transaction;
import pl.kernelpanic.dbmonster.generator.Initializable;
import pl.kernelpanic.dbmonster.generator.KeyGenerator;
import pl.kernelpanic.dbmonster.schema.Column;
import pl.kernelpanic.dbmonster.schema.Key;
import pl.kernelpanic.dbmonster.schema.Table;
/**
* @author Piotr Maj <ant@kernelpanic.pl>
*
* $Revision: 1.1 $ $Date: 2004/06/11 10:37:59 $
*/
public class CompositeKeyGenerator implements KeyGenerator, Initializable {
private Key key;
private DBMonsterContext context;
private Column firstColumn;
private Column secondColumn;
private List columns;
private ConnectionProvider connProvider;
//pabloj@users.sourceforge.net
//added to try to solve the problem I reported on sourceforge
public Key getKey()
{
return key;
}
public void setKey(Key key) {
this.key = key;
}
public List getColumns() {
if (columns == null) {
columns = new ArrayList();
columns.add(firstColumn);
columns.add(secondColumn);
}
return columns;
}
public List generate() throws Exception {
// first: be sure that table invoices is
// already generated
//Table invTable = key.getTable().getSchema().findTable("invoices");
//check that referenced tables are already generated
Table risSpotTable = key.getTable().getSchema().findTable("RS");
//invTable.generate();
risSpotTable.generate();
Table uTable = Key.getTable().getSchema().findTable("U");
uTable.generate();
//checking for both tables will avoid the null pointer exception I mistakenly reported //in the project’s forums
// Transaction is user-friendly wraper for pure JDBC obscure methods.
Transaction tx = null;
try {
tx = new Transaction(connProvider);
tx.begin();
//second: get the random invoice id from the invoices
// table.
//ResultSet rs = tx.executeQuery("SELECT invno FROM invoices ORDER BY random() LIMIT 1");
//rs.next();
//int invno = rs.getInt("invno"); // this is our random invoice id
//pabloj@users.sourceforge.net
//query to get one random record in Oracle
ResultSet rs = tx.executeQuery("SELECT * FROM (SELECT rs.id_r AS id_r FROM rs rs ORDER BY dbms_random.value) WHERE ROWNUM < 2");
rs.next();
int risSpotno = rs.getInt(1); //this is our random id_risposta
// third: generate itemno using MAX + 1 strategy
//rs = tx.executeQuery("SELECT max(itemno) + 1 FROM invoice_items where invno = " + invno);
//int itemno = 1;
//if (rs.next()) {
// itemno = rs.getInt(1);
//}
//pabloj@users.sourceforge.net
//get a random record from the second table
rs = tx.executeQuery("SELECT * FROM (SELECT u.id_u AS id_u FROM u u ORDER BY dbms_random.value) WHERE ROWNUM < 2");
rs.next();
int usrno = rs.getInt(1);
// we have all what we need so just set the column values
firstColumn.setValue(new Integer(risSpotno));
secondColumn.setValue(new Integer(usrno));
tx.commit();
} catch (Exception e) {
throw e;
} finally {
tx.close();
}
return getColumns();
}
public void initialize(DBMonsterContext ctx) throws Exception {
context = ctx;
connProvider = (ConnectionProvider) context.getProperty(DBMonster.CONNECTION_PROVIDER_KEY);
}
public void setFirstColumn(String name) {
firstColumn = new Column();
firstColumn.setName(name);
firstColumn.reset();
}
public String getFirstColumn() {
if (firstColumn != null) {
return firstColumn.getName();
}
return null;
}
public void setSecondColumn(String name) {
secondColumn = new Column();
secondColumn.setName(name);
secondColumn.reset();
}
public String getSecondColumn() {
if (secondColumn != null) {
return secondColumn.getName();
}
return null;
}
}
Ok, finally started moving content ...
Wow, it's incredible, I actually started moving content from my old site to this blog!!!
I'm so busy at work that even this simple task will take a lot of time :-(
It will probably take ages to test and write another tutorial, I'm thinking about a practical case for PostgreSQL 8.1's new "constraint exclusion" feature.
I'm so busy at work that even this simple task will take a lot of time :-(
It will probably take ages to test and write another tutorial, I'm thinking about a practical case for PostgreSQL 8.1's new "constraint exclusion" feature.
Tomcat and MySQL a basic high available - load balanced system
Tomcat and MySQL, a basic high available – load balanced system
Bibliography
http://raibledesigns.com/tomcat/
http://dev.mysql.com/books/hpmysql-excerpts/ch07.html
http://dev.mysql.com/doc/mysql/en/Replication_Features.html
http://dev.mysql.com/doc/mysql/en/InnoDB_and_MySQL_Replication.html
http://dev.mysql.com/doc/mysql/en/Binary_log.html
http://dev.mysql.com/doc/mysql/en/Replication_Options.html
http://jakarta.apache.org/tomcat/tomcat-4.0-doc/config/manager.html
http://www.jguru.com/faq/view.jsp?EID=44035
Tomcat and MySQL, a basic high available – load balanced system
Recently I’ve been investigating a cheap and easy way of giving load balancing and some more (not really “high”) availability to a java webapp, so I came out with this proposal.
It’s based upon MySQL , Apache and Tomcat, it’simple, and even if it has a single point of failure it can be easily transformed into a fully fault tolerant solution through a project like Linux Virtual Server and Linux HA.
Right now it’s only a proof of concept solution using the Windows based versions of the opensource tools I mentioned above.
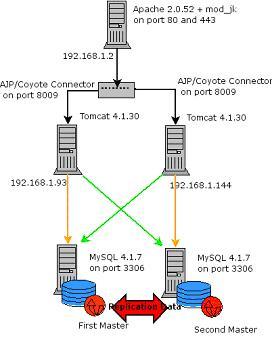
The proposed configuration is something like:
Server one: Apache HTTP Server 2.0.52
Server two: Tomcat 4.1.30 – MySQL 4.1.17 (IP address 192.168.1.93)
Server three: Tomcat 4.1.30 – MySQL 4.1.17 (IP address 192.168.1.144)
As in the following figure:
 The first thing I’ll do in order to build the whole thing is to set up MySQL with Master – Master Replication (i.e. each of the database is a master for the other one) in this way all changes are replicated to both databases, regardless of where they took place, I chose to investigate MySQL Cluster later, as replication is more mature right now.
Since my application will use referential integrity I’ll start experimenting with an InnoDB table, having read about caveats for replication and expecially for InnoDb tables replication. In specific the need to always use the same global character set and collation on the master and the slave and the fact that LOAD TABLE FROM MASTER does not work for InnoDB type tables.
MySQL Master – Master Replication
First of all, download and install MySQL 4.1.7 for Windows one for each server, then check that the db is up and running. (I’m using 4.1.7 nt max).
Create a test table to be replicated, in the default database “test”:
mysql> use test;
Database changed
mysql> CREATE TABLE `test`.`rep_table` (
-> `num_col` INTEGER UNSIGNED NOT NULL AUTO_INCREMENT PRIMARY KEY,
-> `text_col` VARCHAR(45) NOT NULL,
-> `date_col` DATETIME NOT NULL
-> )
-> TYPE = InnoDB;
Query OK, 0 rows affected, 1 warning (0.13 sec)
Check that the table has been correctly created:
mysql> show tables;
+----------------+
| Tables_in_test |
+----------------+
| rep_table |
+----------------+
1 row in set (0.00 sec)
Now, the first thing is to build a master – slave setup, and then promote it to a master – master configuration. In order to accomplish this I created two identical replication accounts on both servers, replication slave and replication client are the two privileges needed:
mysql> grant replication slave, replication client on *.* to replicate@"%" identified by 'password';
Query OK, 0 rows affected (0.00 sec)
Issue a flush privileges to make those changes effective:
mysql> flush privileges;
Query OK, 0 rows affected (0.01 sec)
Check that the grants are correctly registered:
mysql> show grants for replicate@'%';
+------------------------------------------------------------------------------------------------------------------------------------------+
| Grants for replicate@%
|
+------------------------------------------------------------------------------------------------------------------------------------------+
| GRANT REPLICATION SLAVE, REPLICATION CLIENT ON *.* TO 'replicate'@'%' IDENTIFIED BY PASSWORD '*2470C0C06DEE42FD1618BB99005ADCA2EC9D1E19' |
+------------------------------------------------------------------------------------------------------------------------------------------+
1 row in set (0.00 sec)
Now stop both servers (mine where installed as services) and edti the my.ini file.
C:\Program Files\MySQL\MySQL Server 4.1\bin>net stop mysql41
The MySQL41 service is stopping.
The MySQL41 service was stopped successfully.
First the my.ini on the master (IP Address 192.168.1.93), I initially told the server to log updates to the binary log, set it’s server id (which must be unique among the masters and slaves) and told it to not replicate changes to the mysql database (the system database holding users and other settings)
my.ini on the master:
# Added for clustering
log-bin
server-id = 1
set-variable=replicate-ignore-db=mysql
The slave (IP Address 192.168.1.144) needs a bit more of infos, in order to be able to pick up its master, what follows is pretty self explaining:
my.ini on the slave:
# Added for clustering
server-id = 2
master-host = 192.168.1.93
master-user = replicate
master-password = password
master-port = 3306
Check that replication works by inserting a new row into table “rep_table” on the master, to see it added also on the slave.
Now set up the dual master, first of all stop the slave and promote it to master:
C:\Program Files\MySQL\MySQL Server 4.1\bin>net stop mysql41
Then modify the slave’s my.ini by adding some more infos, like the ones given to the master (log-bin and replicate-ignore-db=mysql), this should allow the (former) “slave” to log all changes and make them available to the (former) “master”.
my.ini on the slave:
# Added for clustering
log-bin
server-id = 2
set-variable=replicate-ignore-db=mysql
master-host = 192.168.1.93
master-user = replicate
master-password = password
master-port = 3306
Net start the (former) “slave”and then stop the (former) “master” and modify it’s my.ini, with the instructions needed to pick up the binary log of the newly promoted master.
my.ini on the master:
# Added for clustering
log-bin
server-id = 1
set-variable=replicate-ignore-db=mysql
master-host = 192.168.1.144
master-user = replicate
master-password = password
master-port = 3306
Net start the (former) master.
Now add a row on the (former) “slave” and check it’s been inserted into the (former) “master” and do the same for the (former) “master”.
This could all be accomplished through SQL commands, but I choose to go with ini file manipulation as I was setting up a fresh system, rather then altering an already running one.
In case of problems check the logs for errors! Usually log files are named after the machine name but this new setup adds a new log file in the ./data folder, named mysql.err, in which you can read (this is copied from the (former) “master” log):
041108 11:58:10 InnoDB: Starting shutdown...
041108 11:58:13 InnoDB: Shutdown completed; log sequence number 0 212788
041108 11:58:13 [Note] C:\Program Files\MySQL\MySQL Server 4.1\bin\mysqld-max-nt: Shutdown complete
041108 11:58:58 [Note] Slave SQL thread initialized, starting replication in log 'FIRST' at position 0, relay log '.\MACHINENAME-relay-bin.000001' position: 4
C:\Program Files\MySQL\MySQL Server 4.1\bin\mysqld-max-nt: ready for connections.
Version: '4.1.7-nt-max-log' socket: '' port: 3306 Source distribution
041108 11:58:58 [Note] Slave I/O thread: connected to master 'replicate@192.168.1.144:3306', replication started in log 'FIRST' at position 4
While in the MACHINENAME.err you can read:
041108 11:49:06 InnoDB: Started; log sequence number 0 212611
041108 11:50:08 InnoDB: Started; log sequence number 0 212657
041108 11:58:58 InnoDB: Started; log sequence number 0 212788
In order to get a more reliable setup I added some more directives to my.ini on both machines:
innodb-safe-binlog
sync_binlog=1
The first parameter adds consistency between the binary log and InnoDB tables content, as at commit the transaction is written to the bianry log and then into InnoDB tables, in case of a crash between the two operations the transaction will be rolled back from InnoDB tables, but will remain in the log, making it inconsistent.
The second parameter forces writes of transactions to the log at each commit.
Clustering with Tomcat, Apache and mod_jk
Having set up a replicated MySQL environment, I started by configuring a load balanced installation of Tomcat with the mean of Apache Http server and the clustering abilies of it’s tomcat connector, mod_jk.
I installed (for simplicity, this is a proof-of-concept and not a production system) Tomcat 4.1.30 on the two machines on which MySQL is residing, I did a standard setup with Tomcat running as a service.
Then I installed Apache Http server 2.0.52 on a third machine and started the configuration.
I downloaded mod_jk_apache_1.2.6_2.0.50.dll from (http://mirrors.publicshout.org/apache/jakarta/tomcat-connectors/jk/binaries/win32/) renamed it mod_jk.dll and placed it in the Apache’s ./modules subfolder.
Then I added some lines to the httpd.conf, in order to enable the new module:
# Load mod_jk
#
LoadModule jk_module modules/mod_jk.dll
#
# Configure mod_jk
#
JkWorkersFile conf/workers.properties
JkLogFile logs/mod_jk.log
JkLogLevel info
#
In a few words I told Apache to load the module and to pick up it’s configuration from a file named workers.properties, located in the ./conf folder, to log it’s activity to a file named mod_jk.log in the logs directory and that the log level is “info”.
The lines above were added immediately before the modules section, then, after the line that reads:
# DocumentRoot: The directory out of which you will serve your
# documents. By default, all requests are taken from this directory, but
# symbolic links and aliases may be used to point to other locations.
#
DocumentRoot "C:/Program Files/Apache Group/Apache2/htdocs"
I added other configuration directives for mod_jk:
# Added for load balancing
JkMount /*.jsp loadbalancer
JkMount /servlet/* loadbalancer
JkMount /examples/* loadbalancer
JkMount /*.gif loadbalancer
The above instructions are to make available through mod_jk the root folder (jsp and gif files only) of Tomcat and also the ./servlet and ./examples folders.
I changed the two index.jsp pages of tomcat in order to visually differentiate the servers (red background for 192.168.1.93, yellow background for 192.168.1.144).
The other thing that needs to be done is write a workers.properties, as I told apache to use it:
#
# workers.properties
#
# You should configure your environment slash... ps=\ on NT and / on UNIX
#
ps=\
# list the workers by name
worker.list=tomcat1, tomcat2, loadbalancer
# ------------------------
# First tomcat server
# ------------------------
worker.tomcat1.port=8009
worker.tomcat1.host=localhost
worker.tomcat1.type=ajp13
# Specify the size of the open connection cache.
#worker.tomcat1.cachesize
#
# Specifies the load balance factor when used with
# a load balancing worker.
# Note:
# ----> lbfactor must be > 0
# ----> Low lbfactor means less work done by the worker.
worker.tomcat1.lbfactor=10
# ------------------------
# Second tomcat server
# ------------------------
worker.tomcat2.port=8009
worker.tomcat2.host=192.168.1.144
worker.tomcat2.type=ajp13
# Specify the size of the open connection cache.
#worker.tomcat2.cachesize
#
# Specifies the load balance factor when used with
# a load balancing worker.
# Note:
# ----> lbfactor must be > 0
# ----> Low lbfactor means less work done by the worker.
worker.tomcat2.lbfactor=100
# ------------------------
# Load Balancer worker
# ------------------------
#
# The loadbalancer (type lb) worker performs weighted round-robin
# load balancing with sticky sessions.
# Note:
# ----> If a worker dies, the load balancer will check its state
# once in a while. Until then all work is redirected to peer
# worker.
worker.loadbalancer.type=lb
worker.loadbalancer.balanced_workers=tomcat1, tomcat2
#
# END workers.properties
#
Note that we defined two workers, (named “tomcat1” and “tomcat2”), then specified their properties (port, host, type and lbfactor). After this we defined a load balancer and configured it to balance the two workers defined above.
Comments in the file above explain well how the load balancer works (weighted round robin with sticky sessions, the weight is given by the lbfactor parameter).
A quick test, performed using a browser, shows that load balancing and stickyness of sessions (a session initiated on a server stays on that server until the end) work.
Another nice thing is that a client is transparently redirected to another server in case of failure of the Tomcat it is running on.
This made me think about the chance to save session data on the database and have Tomcat pick them up there, thus giving the system the ability to survive an app server or database server crash.
Session data replication
In order to accomplish this (sessions stored on the database for our application) we need to:
The first step is easily accomplished:
C:\Program Files\MySQL\MySQL Server 4.1\bin>mysql -h 192.168.1.144 -u root -p
Enter password: *******
Welcome to the MySQL monitor. Commands end with ; or \g.
Your MySQL connection id is 13 to server version: 4.1.7-nt-max-log
Type 'help;' or '\h' for help. Type '\c' to clear the buffer.
mysql> create database tomcat_user_auth;
Query OK, 1 row affected (0.04 sec)
mysql> use tomcat_user_auth;
Database changed
mysql> CREATE TABLE `tomcat_sessions` (
-> `session_id` varchar(100) NOT NULL default '',
-> `valid_session` char(1) NOT NULL default '',
-> `max_inactive` int(11) NOT NULL default '0',
-> `last_access` bigint(20) NOT NULL default '0',
-> `app_name` varchar(255) default NULL,
-> `session_data` mediumblob,
-> PRIMARY KEY (`session_id`)
-> ) ENGINE=MyISAM;
Query OK, 0 rows affected (0.12 sec)
mysql>
Modify Tomcat’s standard examples webapp to use MySQL as a persistent sessionstorage manager by adding:
<Manager className="org.apache.catalina.session.PersistentManager" algorithm="MD5" checkInterval="1" debug="10" distributable="false" duplicates="0" entropy="org.apache.catalina.session.PersistentManager@c68a98" maxActive="0" maxActiveSessions="-1" maxIdleBackup="0" maxIdleSwap="0" maxInactiveInterval="1800" minIdleSwap="-1" randomClass="java.security.SecureRandom" saveOnRestart="true" sessionCounter="0">
<Store className="org.apache.catalina.session.JDBCStore" checkInterval="60" connectionURL="jdbc:mysql://localhost/tomcat_user_auth?user=tomcat&password=tomcat" debug="100" driverName="com.mysql.jdbc.Driver" sessionAppCol="app_name" sessionDataCol="session_data" sessionIdCol="session_id" sessionLastAccessedCol="last_access" sessionMaxInactiveCol="max_inactive" sessionTable="tomcat_sessions" sessionValidCol="valid_session"/>
</Manager>
Now restart the whole lot of services (both MySQLs and Tomcats) and test with the sessions servlet in Tomcat’s example webapp.
This is not perfect as the support for a persistent session storage is still in it’s infancy in Tomcat and it’s not a real time storage, parameters like:
checkInterval="1", maxIdleSwap="0", maxIdleBackup="0"
Should keep the sync interval at around 1 second.
Now the system should be set up to:
Receive all requests on “Server 1” with Apache loadbalancing between the two tomcats (“Server 2” and “Server 3”), each connecting to it’s own mysql server (“Server 2” and “Server 3” again) kept in sync by mysql’s replication feature.
In case of failure of one of the backend servers Apache should redirect the user requests to the remaining server and replication should enable session persistence and application integrity.
Application failover, adding some more availabilty to the system
Right now the system can keep track of the session variable, thus a user session can survive the crash of the Tomcat server on which it has been running, but now I want to add more, the ability for an application running on the Tomcats to survive a database crashm by connecting to the other MySQL, which, thanks to replication, should hold an updated copy of the data used by the application.
In this case I’m working on a business intelligence application, in other words an application that mainly reads data loaded by other (external) processes.
The easiest way to add another level of availability to my application is to use … the built in features of MySQL’s JDBC driver!!!!
Infact this driver comes with support for failover, which, by default is read-only, this is not a problem in my application, but it could be in your, so beware and set the appropriate parameter.
The first thing to check and modify is the JDBC URL:
jdbc:mysql://[host][,failoverhost...][:port]/[database][?propertyName1][= …
so, the first thing for us is to specify a failover host, in our case the “other” mysql server, the line will become something like:
jdbc:mysql://192.168.1.93, 192.168.1.144/my_database
now I’ll add more parameters in order to improve the app’s behaviour. The first parameter in the list is enables zlib compression, this should improve performance as I’m sometimes retrieving a huge amount of data, by reducing network load, the result is:
jdbc:mysql://192.168.1.93, 192.168.1.144/my_database?useCompression=true
and then all the parameters related to failover:
autoReconnect=true (the driver will try to reconnect automatically)
maxReconnects=2 (number of tries when autoreconnect is set to true)
initialTimeout=2 (number of seconds to wait between attempts to reconnect)
queriesBeforeRetryMaster=20 (number of queries run on failover server before trying to reconnect to master)
secondsBeforeRetryMaster=40 (number of seconds to wait before tryingto reconnect to master)
The last property sounds a bit strange, the docs state that the server fails to read-only, but there is a documented parameter about having the driver fail over in read/write mode:
failOverReadOnly=false (default is true, in this dual master setup it’s safe to set it to true, even if a Business Intelligence app doesn’t need it)
The connection string has become quite long, another, much more readable, way of setting all those options is to pass them through a java.util.Properties instance and passing it to the DriverManager at connection.
…
Properties properties = new Properties();
properties.put("user", "your_username");
properties.put("password", "your_password");
properties.put("autoReconnect", "true");
…
Connection conn = DriverManager.getConnection(url, properties);
conn.setAutoCommit(true);
…
so far we added another layer of availability to the application, that can now survive a crash of the application server (Tomcat) or of the database server (MySQL).
A simple test can be conducted by stopping second master (in this case MySQL on 192.168.1.144) and using the following jsp, which has the active MySQL server (192.168.1.93) as the failover server.
You’ll see that the output is what expected.
Test.jsp:
<%@ page contentType="text/html; charset=iso-8859-1" language="java" import="java.sql.*, java.util.Properties" errorPage="" %>
<html>
<head>
<title>Test failover page</title>
<meta http-equiv="Content-Type" content="text/html; charset=iso-8859-1">
</head>
<body>
<%
String connectionURL = "jdbc:mysql://192.168.1.144, 192.168.1.93/test";
Properties properties = new Properties();
properties.put("user", "root");
properties.put("password", "");
properties.put("useCompression", "true");
properties.put("autoReconnect", "true");
properties.put("maxReconnects", "2");
properties.put("queriesBeforeRetryMaster", "20");
properties.put("secondsBeforeRetryMaster", "40");
properties.put("failOverReadOnly", "false");
Class.forName("com.mysql.jdbc.Driver").newInstance();
Connection conn = DriverManager.getConnection(connectionURL, properties);
conn.setAutoCommit(true);
PreparedStatement insertStatement = conn.prepareStatement("INSERT INTO testtable (testfield) VALUES ('testvalue')");
insertStatement.executeUpdate();
Statement statement = conn.createStatement();
ResultSet rs = statement.executeQuery("SELECT * FROM testtable");
while (rs.next()) {
out.println(rs.getString("testfield")+"<br>");
}
rs.close();
conn.close();
%>
</body>
</html>
Bibliography
http://raibledesigns.com/tomcat/
http://dev.mysql.com/books/hpmysql-excerpts/ch07.html
http://dev.mysql.com/doc/mysql/en/Replication_Features.html
http://dev.mysql.com/doc/mysql/en/InnoDB_and_MySQL_Replication.html
http://dev.mysql.com/doc/mysql/en/Binary_log.html
http://dev.mysql.com/doc/mysql/en/Replication_Options.html
http://jakarta.apache.org/tomcat/tomcat-4.0-doc/config/manager.html
http://www.jguru.com/faq/view.jsp?EID=44035
Tomcat and MySQL, a basic high available – load balanced system
Recently I’ve been investigating a cheap and easy way of giving load balancing and some more (not really “high”) availability to a java webapp, so I came out with this proposal.
It’s based upon MySQL , Apache and Tomcat, it’simple, and even if it has a single point of failure it can be easily transformed into a fully fault tolerant solution through a project like Linux Virtual Server and Linux HA.
Right now it’s only a proof of concept solution using the Windows based versions of the opensource tools I mentioned above.
The proposed configuration is something like:
Server one: Apache HTTP Server 2.0.52
Server two: Tomcat 4.1.30 – MySQL 4.1.17 (IP address 192.168.1.93)
Server three: Tomcat 4.1.30 – MySQL 4.1.17 (IP address 192.168.1.144)
As in the following figure:
 The first thing I’ll do in order to build the whole thing is to set up MySQL with Master – Master Replication (i.e. each of the database is a master for the other one) in this way all changes are replicated to both databases, regardless of where they took place, I chose to investigate MySQL Cluster later, as replication is more mature right now.
Since my application will use referential integrity I’ll start experimenting with an InnoDB table, having read about caveats for replication and expecially for InnoDb tables replication. In specific the need to always use the same global character set and collation on the master and the slave and the fact that LOAD TABLE FROM MASTER does not work for InnoDB type tables.
MySQL Master – Master Replication
First of all, download and install MySQL 4.1.7 for Windows one for each server, then check that the db is up and running. (I’m using 4.1.7 nt max).
Create a test table to be replicated, in the default database “test”:
mysql> use test;
Database changed
mysql> CREATE TABLE `test`.`rep_table` (
-> `num_col` INTEGER UNSIGNED NOT NULL AUTO_INCREMENT PRIMARY KEY,
-> `text_col` VARCHAR(45) NOT NULL,
-> `date_col` DATETIME NOT NULL
-> )
-> TYPE = InnoDB;
Query OK, 0 rows affected, 1 warning (0.13 sec)
Check that the table has been correctly created:
mysql> show tables;
+----------------+
| Tables_in_test |
+----------------+
| rep_table |
+----------------+
1 row in set (0.00 sec)
Now, the first thing is to build a master – slave setup, and then promote it to a master – master configuration. In order to accomplish this I created two identical replication accounts on both servers, replication slave and replication client are the two privileges needed:
mysql> grant replication slave, replication client on *.* to replicate@"%" identified by 'password';
Query OK, 0 rows affected (0.00 sec)
Issue a flush privileges to make those changes effective:
mysql> flush privileges;
Query OK, 0 rows affected (0.01 sec)
Check that the grants are correctly registered:
mysql> show grants for replicate@'%';
+------------------------------------------------------------------------------------------------------------------------------------------+
| Grants for replicate@%
|
+------------------------------------------------------------------------------------------------------------------------------------------+
| GRANT REPLICATION SLAVE, REPLICATION CLIENT ON *.* TO 'replicate'@'%' IDENTIFIED BY PASSWORD '*2470C0C06DEE42FD1618BB99005ADCA2EC9D1E19' |
+------------------------------------------------------------------------------------------------------------------------------------------+
1 row in set (0.00 sec)
Now stop both servers (mine where installed as services) and edti the my.ini file.
C:\Program Files\MySQL\MySQL Server 4.1\bin>net stop mysql41
The MySQL41 service is stopping.
The MySQL41 service was stopped successfully.
First the my.ini on the master (IP Address 192.168.1.93), I initially told the server to log updates to the binary log, set it’s server id (which must be unique among the masters and slaves) and told it to not replicate changes to the mysql database (the system database holding users and other settings)
my.ini on the master:
# Added for clustering
log-bin
server-id = 1
set-variable=replicate-ignore-db=mysql
The slave (IP Address 192.168.1.144) needs a bit more of infos, in order to be able to pick up its master, what follows is pretty self explaining:
my.ini on the slave:
# Added for clustering
server-id = 2
master-host = 192.168.1.93
master-user = replicate
master-password = password
master-port = 3306
Check that replication works by inserting a new row into table “rep_table” on the master, to see it added also on the slave.
Now set up the dual master, first of all stop the slave and promote it to master:
C:\Program Files\MySQL\MySQL Server 4.1\bin>net stop mysql41
Then modify the slave’s my.ini by adding some more infos, like the ones given to the master (log-bin and replicate-ignore-db=mysql), this should allow the (former) “slave” to log all changes and make them available to the (former) “master”.
my.ini on the slave:
# Added for clustering
log-bin
server-id = 2
set-variable=replicate-ignore-db=mysql
master-host = 192.168.1.93
master-user = replicate
master-password = password
master-port = 3306
Net start the (former) “slave”and then stop the (former) “master” and modify it’s my.ini, with the instructions needed to pick up the binary log of the newly promoted master.
my.ini on the master:
# Added for clustering
log-bin
server-id = 1
set-variable=replicate-ignore-db=mysql
master-host = 192.168.1.144
master-user = replicate
master-password = password
master-port = 3306
Net start the (former) master.
Now add a row on the (former) “slave” and check it’s been inserted into the (former) “master” and do the same for the (former) “master”.
This could all be accomplished through SQL commands, but I choose to go with ini file manipulation as I was setting up a fresh system, rather then altering an already running one.
In case of problems check the logs for errors! Usually log files are named after the machine name but this new setup adds a new log file in the ./data folder, named mysql.err, in which you can read (this is copied from the (former) “master” log):
041108 11:58:10 InnoDB: Starting shutdown...
041108 11:58:13 InnoDB: Shutdown completed; log sequence number 0 212788
041108 11:58:13 [Note] C:\Program Files\MySQL\MySQL Server 4.1\bin\mysqld-max-nt: Shutdown complete
041108 11:58:58 [Note] Slave SQL thread initialized, starting replication in log 'FIRST' at position 0, relay log '.\MACHINENAME-relay-bin.000001' position: 4
C:\Program Files\MySQL\MySQL Server 4.1\bin\mysqld-max-nt: ready for connections.
Version: '4.1.7-nt-max-log' socket: '' port: 3306 Source distribution
041108 11:58:58 [Note] Slave I/O thread: connected to master 'replicate@192.168.1.144:3306', replication started in log 'FIRST' at position 4
While in the MACHINENAME.err you can read:
041108 11:49:06 InnoDB: Started; log sequence number 0 212611
041108 11:50:08 InnoDB: Started; log sequence number 0 212657
041108 11:58:58 InnoDB: Started; log sequence number 0 212788
In order to get a more reliable setup I added some more directives to my.ini on both machines:
innodb-safe-binlog
sync_binlog=1
The first parameter adds consistency between the binary log and InnoDB tables content, as at commit the transaction is written to the bianry log and then into InnoDB tables, in case of a crash between the two operations the transaction will be rolled back from InnoDB tables, but will remain in the log, making it inconsistent.
The second parameter forces writes of transactions to the log at each commit.
Clustering with Tomcat, Apache and mod_jk
Having set up a replicated MySQL environment, I started by configuring a load balanced installation of Tomcat with the mean of Apache Http server and the clustering abilies of it’s tomcat connector, mod_jk.
I installed (for simplicity, this is a proof-of-concept and not a production system) Tomcat 4.1.30 on the two machines on which MySQL is residing, I did a standard setup with Tomcat running as a service.
Then I installed Apache Http server 2.0.52 on a third machine and started the configuration.
I downloaded mod_jk_apache_1.2.6_2.0.50.dll from (http://mirrors.publicshout.org/apache/jakarta/tomcat-connectors/jk/binaries/win32/) renamed it mod_jk.dll and placed it in the Apache’s ./modules subfolder.
Then I added some lines to the httpd.conf, in order to enable the new module:
# Load mod_jk
#
LoadModule jk_module modules/mod_jk.dll
#
# Configure mod_jk
#
JkWorkersFile conf/workers.properties
JkLogFile logs/mod_jk.log
JkLogLevel info
#
In a few words I told Apache to load the module and to pick up it’s configuration from a file named workers.properties, located in the ./conf folder, to log it’s activity to a file named mod_jk.log in the logs directory and that the log level is “info”.
The lines above were added immediately before the modules section, then, after the line that reads:
# DocumentRoot: The directory out of which you will serve your
# documents. By default, all requests are taken from this directory, but
# symbolic links and aliases may be used to point to other locations.
#
DocumentRoot "C:/Program Files/Apache Group/Apache2/htdocs"
I added other configuration directives for mod_jk:
# Added for load balancing
JkMount /*.jsp loadbalancer
JkMount /servlet/* loadbalancer
JkMount /examples/* loadbalancer
JkMount /*.gif loadbalancer
The above instructions are to make available through mod_jk the root folder (jsp and gif files only) of Tomcat and also the ./servlet and ./examples folders.
I changed the two index.jsp pages of tomcat in order to visually differentiate the servers (red background for 192.168.1.93, yellow background for 192.168.1.144).
The other thing that needs to be done is write a workers.properties, as I told apache to use it:
#
# workers.properties
#
# You should configure your environment slash... ps=\ on NT and / on UNIX
#
ps=\
# list the workers by name
worker.list=tomcat1, tomcat2, loadbalancer
# ------------------------
# First tomcat server
# ------------------------
worker.tomcat1.port=8009
worker.tomcat1.host=localhost
worker.tomcat1.type=ajp13
# Specify the size of the open connection cache.
#worker.tomcat1.cachesize
#
# Specifies the load balance factor when used with
# a load balancing worker.
# Note:
# ----> lbfactor must be > 0
# ----> Low lbfactor means less work done by the worker.
worker.tomcat1.lbfactor=10
# ------------------------
# Second tomcat server
# ------------------------
worker.tomcat2.port=8009
worker.tomcat2.host=192.168.1.144
worker.tomcat2.type=ajp13
# Specify the size of the open connection cache.
#worker.tomcat2.cachesize
#
# Specifies the load balance factor when used with
# a load balancing worker.
# Note:
# ----> lbfactor must be > 0
# ----> Low lbfactor means less work done by the worker.
worker.tomcat2.lbfactor=100
# ------------------------
# Load Balancer worker
# ------------------------
#
# The loadbalancer (type lb) worker performs weighted round-robin
# load balancing with sticky sessions.
# Note:
# ----> If a worker dies, the load balancer will check its state
# once in a while. Until then all work is redirected to peer
# worker.
worker.loadbalancer.type=lb
worker.loadbalancer.balanced_workers=tomcat1, tomcat2
#
# END workers.properties
#
Note that we defined two workers, (named “tomcat1” and “tomcat2”), then specified their properties (port, host, type and lbfactor). After this we defined a load balancer and configured it to balance the two workers defined above.
Comments in the file above explain well how the load balancer works (weighted round robin with sticky sessions, the weight is given by the lbfactor parameter).
A quick test, performed using a browser, shows that load balancing and stickyness of sessions (a session initiated on a server stays on that server until the end) work.
Another nice thing is that a client is transparently redirected to another server in case of failure of the Tomcat it is running on.
This made me think about the chance to save session data on the database and have Tomcat pick them up there, thus giving the system the ability to survive an app server or database server crash.
Session data replication
In order to accomplish this (sessions stored on the database for our application) we need to:
- Create structure to hold data in both instances of MySQL
- Alter the ./conf/server.xml to tell Tomcat to use JDBCStorage
The first step is easily accomplished:
C:\Program Files\MySQL\MySQL Server 4.1\bin>mysql -h 192.168.1.144 -u root -p
Enter password: *******
Welcome to the MySQL monitor. Commands end with ; or \g.
Your MySQL connection id is 13 to server version: 4.1.7-nt-max-log
Type 'help;' or '\h' for help. Type '\c' to clear the buffer.
mysql> create database tomcat_user_auth;
Query OK, 1 row affected (0.04 sec)
mysql> use tomcat_user_auth;
Database changed
mysql> CREATE TABLE `tomcat_sessions` (
-> `session_id` varchar(100) NOT NULL default '',
-> `valid_session` char(1) NOT NULL default '',
-> `max_inactive` int(11) NOT NULL default '0',
-> `last_access` bigint(20) NOT NULL default '0',
-> `app_name` varchar(255) default NULL,
-> `session_data` mediumblob,
-> PRIMARY KEY (`session_id`)
-> ) ENGINE=MyISAM;
Query OK, 0 rows affected (0.12 sec)
mysql>
Modify Tomcat’s standard examples webapp to use MySQL as a persistent sessionstorage manager by adding:
<Manager className="org.apache.catalina.session.PersistentManager" algorithm="MD5" checkInterval="1" debug="10" distributable="false" duplicates="0" entropy="org.apache.catalina.session.PersistentManager@c68a98" maxActive="0" maxActiveSessions="-1" maxIdleBackup="0" maxIdleSwap="0" maxInactiveInterval="1800" minIdleSwap="-1" randomClass="java.security.SecureRandom" saveOnRestart="true" sessionCounter="0">
<Store className="org.apache.catalina.session.JDBCStore" checkInterval="60" connectionURL="jdbc:mysql://localhost/tomcat_user_auth?user=tomcat&password=tomcat" debug="100" driverName="com.mysql.jdbc.Driver" sessionAppCol="app_name" sessionDataCol="session_data" sessionIdCol="session_id" sessionLastAccessedCol="last_access" sessionMaxInactiveCol="max_inactive" sessionTable="tomcat_sessions" sessionValidCol="valid_session"/>
</Manager>
Now restart the whole lot of services (both MySQLs and Tomcats) and test with the sessions servlet in Tomcat’s example webapp.
This is not perfect as the support for a persistent session storage is still in it’s infancy in Tomcat and it’s not a real time storage, parameters like:
checkInterval="1", maxIdleSwap="0", maxIdleBackup="0"
Should keep the sync interval at around 1 second.
Now the system should be set up to:
Receive all requests on “Server 1” with Apache loadbalancing between the two tomcats (“Server 2” and “Server 3”), each connecting to it’s own mysql server (“Server 2” and “Server 3” again) kept in sync by mysql’s replication feature.
In case of failure of one of the backend servers Apache should redirect the user requests to the remaining server and replication should enable session persistence and application integrity.
Application failover, adding some more availabilty to the system
Right now the system can keep track of the session variable, thus a user session can survive the crash of the Tomcat server on which it has been running, but now I want to add more, the ability for an application running on the Tomcats to survive a database crashm by connecting to the other MySQL, which, thanks to replication, should hold an updated copy of the data used by the application.
In this case I’m working on a business intelligence application, in other words an application that mainly reads data loaded by other (external) processes.
The easiest way to add another level of availability to my application is to use … the built in features of MySQL’s JDBC driver!!!!
Infact this driver comes with support for failover, which, by default is read-only, this is not a problem in my application, but it could be in your, so beware and set the appropriate parameter.
The first thing to check and modify is the JDBC URL:
jdbc:mysql://[host][,failoverhost...][:port]/[database][?propertyName1][= …
so, the first thing for us is to specify a failover host, in our case the “other” mysql server, the line will become something like:
jdbc:mysql://192.168.1.93, 192.168.1.144/my_database
now I’ll add more parameters in order to improve the app’s behaviour. The first parameter in the list is enables zlib compression, this should improve performance as I’m sometimes retrieving a huge amount of data, by reducing network load, the result is:
jdbc:mysql://192.168.1.93, 192.168.1.144/my_database?useCompression=true
and then all the parameters related to failover:
autoReconnect=true (the driver will try to reconnect automatically)
maxReconnects=2 (number of tries when autoreconnect is set to true)
initialTimeout=2 (number of seconds to wait between attempts to reconnect)
queriesBeforeRetryMaster=20 (number of queries run on failover server before trying to reconnect to master)
secondsBeforeRetryMaster=40 (number of seconds to wait before tryingto reconnect to master)
The last property sounds a bit strange, the docs state that the server fails to read-only, but there is a documented parameter about having the driver fail over in read/write mode:
failOverReadOnly=false (default is true, in this dual master setup it’s safe to set it to true, even if a Business Intelligence app doesn’t need it)
The connection string has become quite long, another, much more readable, way of setting all those options is to pass them through a java.util.Properties instance and passing it to the DriverManager at connection.
…
Properties properties = new Properties();
properties.put("user", "your_username");
properties.put("password", "your_password");
properties.put("autoReconnect", "true");
…
Connection conn = DriverManager.getConnection(url, properties);
conn.setAutoCommit(true);
…
so far we added another layer of availability to the application, that can now survive a crash of the application server (Tomcat) or of the database server (MySQL).
A simple test can be conducted by stopping second master (in this case MySQL on 192.168.1.144) and using the following jsp, which has the active MySQL server (192.168.1.93) as the failover server.
You’ll see that the output is what expected.
Test.jsp:
<%@ page contentType="text/html; charset=iso-8859-1" language="java" import="java.sql.*, java.util.Properties" errorPage="" %>
<html>
<head>
<title>Test failover page</title>
<meta http-equiv="Content-Type" content="text/html; charset=iso-8859-1">
</head>
<body>
<%
String connectionURL = "jdbc:mysql://192.168.1.144, 192.168.1.93/test";
Properties properties = new Properties();
properties.put("user", "root");
properties.put("password", "");
properties.put("useCompression", "true");
properties.put("autoReconnect", "true");
properties.put("maxReconnects", "2");
properties.put("queriesBeforeRetryMaster", "20");
properties.put("secondsBeforeRetryMaster", "40");
properties.put("failOverReadOnly", "false");
Class.forName("com.mysql.jdbc.Driver").newInstance();
Connection conn = DriverManager.getConnection(connectionURL, properties);
conn.setAutoCommit(true);
PreparedStatement insertStatement = conn.prepareStatement("INSERT INTO testtable (testfield) VALUES ('testvalue')");
insertStatement.executeUpdate();
Statement statement = conn.createStatement();
ResultSet rs = statement.executeQuery("SELECT * FROM testtable");
while (rs.next()) {
out.println(rs.getString("testfield")+"<br>");
}
rs.close();
conn.close();
%>
</body>
</html>
Subscribe to:
Posts (Atom)