Bibliography
http://raibledesigns.com/tomcat/
http://dev.mysql.com/books/hpmysql-excerpts/ch07.html
http://dev.mysql.com/doc/mysql/en/Replication_Features.html
http://dev.mysql.com/doc/mysql/en/InnoDB_and_MySQL_Replication.html
http://dev.mysql.com/doc/mysql/en/Binary_log.html
http://dev.mysql.com/doc/mysql/en/Replication_Options.html
http://jakarta.apache.org/tomcat/tomcat-4.0-doc/config/manager.html
http://www.jguru.com/faq/view.jsp?EID=44035
Tomcat and MySQL, a basic high available – load balanced system
Recently I’ve been investigating a cheap and easy way of giving load balancing and some more (not really “high”) availability to a java webapp, so I came out with this proposal.
It’s based upon MySQL , Apache and Tomcat, it’simple, and even if it has a single point of failure it can be easily transformed into a fully fault tolerant solution through a project like Linux Virtual Server and Linux HA.
Right now it’s only a proof of concept solution using the Windows based versions of the opensource tools I mentioned above.
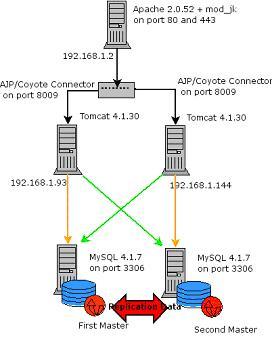
The proposed configuration is something like:
Server one: Apache HTTP Server 2.0.52
Server two: Tomcat 4.1.30 – MySQL 4.1.17 (IP address 192.168.1.93)
Server three: Tomcat 4.1.30 – MySQL 4.1.17 (IP address 192.168.1.144)
As in the following figure:
 The first thing I’ll do in order to build the whole thing is to set up MySQL with Master – Master Replication (i.e. each of the database is a master for the other one) in this way all changes are replicated to both databases, regardless of where they took place, I chose to investigate MySQL Cluster later, as replication is more mature right now.
Since my application will use referential integrity I’ll start experimenting with an InnoDB table, having read about caveats for replication and expecially for InnoDb tables replication. In specific the need to always use the same global character set and collation on the master and the slave and the fact that LOAD TABLE FROM MASTER does not work for InnoDB type tables.
MySQL Master – Master Replication
First of all, download and install MySQL 4.1.7 for Windows one for each server, then check that the db is up and running. (I’m using 4.1.7 nt max).
Create a test table to be replicated, in the default database “test”:
mysql> use test;
Database changed
mysql> CREATE TABLE `test`.`rep_table` (
-> `num_col` INTEGER UNSIGNED NOT NULL AUTO_INCREMENT PRIMARY KEY,
-> `text_col` VARCHAR(45) NOT NULL,
-> `date_col` DATETIME NOT NULL
-> )
-> TYPE = InnoDB;
Query OK, 0 rows affected, 1 warning (0.13 sec)
Check that the table has been correctly created:
mysql> show tables;
+----------------+
| Tables_in_test |
+----------------+
| rep_table |
+----------------+
1 row in set (0.00 sec)
Now, the first thing is to build a master – slave setup, and then promote it to a master – master configuration. In order to accomplish this I created two identical replication accounts on both servers, replication slave and replication client are the two privileges needed:
mysql> grant replication slave, replication client on *.* to replicate@"%" identified by 'password';
Query OK, 0 rows affected (0.00 sec)
Issue a flush privileges to make those changes effective:
mysql> flush privileges;
Query OK, 0 rows affected (0.01 sec)
Check that the grants are correctly registered:
mysql> show grants for replicate@'%';
+------------------------------------------------------------------------------------------------------------------------------------------+
| Grants for replicate@%
|
+------------------------------------------------------------------------------------------------------------------------------------------+
| GRANT REPLICATION SLAVE, REPLICATION CLIENT ON *.* TO 'replicate'@'%' IDENTIFIED BY PASSWORD '*2470C0C06DEE42FD1618BB99005ADCA2EC9D1E19' |
+------------------------------------------------------------------------------------------------------------------------------------------+
1 row in set (0.00 sec)
Now stop both servers (mine where installed as services) and edti the my.ini file.
C:\Program Files\MySQL\MySQL Server 4.1\bin>net stop mysql41
The MySQL41 service is stopping.
The MySQL41 service was stopped successfully.
First the my.ini on the master (IP Address 192.168.1.93), I initially told the server to log updates to the binary log, set it’s server id (which must be unique among the masters and slaves) and told it to not replicate changes to the mysql database (the system database holding users and other settings)
my.ini on the master:
# Added for clustering
log-bin
server-id = 1
set-variable=replicate-ignore-db=mysql
The slave (IP Address 192.168.1.144) needs a bit more of infos, in order to be able to pick up its master, what follows is pretty self explaining:
my.ini on the slave:
# Added for clustering
server-id = 2
master-host = 192.168.1.93
master-user = replicate
master-password = password
master-port = 3306
Check that replication works by inserting a new row into table “rep_table” on the master, to see it added also on the slave.
Now set up the dual master, first of all stop the slave and promote it to master:
C:\Program Files\MySQL\MySQL Server 4.1\bin>net stop mysql41
Then modify the slave’s my.ini by adding some more infos, like the ones given to the master (log-bin and replicate-ignore-db=mysql), this should allow the (former) “slave” to log all changes and make them available to the (former) “master”.
my.ini on the slave:
# Added for clustering
log-bin
server-id = 2
set-variable=replicate-ignore-db=mysql
master-host = 192.168.1.93
master-user = replicate
master-password = password
master-port = 3306
Net start the (former) “slave”and then stop the (former) “master” and modify it’s my.ini, with the instructions needed to pick up the binary log of the newly promoted master.
my.ini on the master:
# Added for clustering
log-bin
server-id = 1
set-variable=replicate-ignore-db=mysql
master-host = 192.168.1.144
master-user = replicate
master-password = password
master-port = 3306
Net start the (former) master.
Now add a row on the (former) “slave” and check it’s been inserted into the (former) “master” and do the same for the (former) “master”.
This could all be accomplished through SQL commands, but I choose to go with ini file manipulation as I was setting up a fresh system, rather then altering an already running one.
In case of problems check the logs for errors! Usually log files are named after the machine name but this new setup adds a new log file in the ./data folder, named mysql.err, in which you can read (this is copied from the (former) “master” log):
041108 11:58:10 InnoDB: Starting shutdown...
041108 11:58:13 InnoDB: Shutdown completed; log sequence number 0 212788
041108 11:58:13 [Note] C:\Program Files\MySQL\MySQL Server 4.1\bin\mysqld-max-nt: Shutdown complete
041108 11:58:58 [Note] Slave SQL thread initialized, starting replication in log 'FIRST' at position 0, relay log '.\MACHINENAME-relay-bin.000001' position: 4
C:\Program Files\MySQL\MySQL Server 4.1\bin\mysqld-max-nt: ready for connections.
Version: '4.1.7-nt-max-log' socket: '' port: 3306 Source distribution
041108 11:58:58 [Note] Slave I/O thread: connected to master 'replicate@192.168.1.144:3306', replication started in log 'FIRST' at position 4
While in the MACHINENAME.err you can read:
041108 11:49:06 InnoDB: Started; log sequence number 0 212611
041108 11:50:08 InnoDB: Started; log sequence number 0 212657
041108 11:58:58 InnoDB: Started; log sequence number 0 212788
In order to get a more reliable setup I added some more directives to my.ini on both machines:
innodb-safe-binlog
sync_binlog=1
The first parameter adds consistency between the binary log and InnoDB tables content, as at commit the transaction is written to the bianry log and then into InnoDB tables, in case of a crash between the two operations the transaction will be rolled back from InnoDB tables, but will remain in the log, making it inconsistent.
The second parameter forces writes of transactions to the log at each commit.
Clustering with Tomcat, Apache and mod_jk
Having set up a replicated MySQL environment, I started by configuring a load balanced installation of Tomcat with the mean of Apache Http server and the clustering abilies of it’s tomcat connector, mod_jk.
I installed (for simplicity, this is a proof-of-concept and not a production system) Tomcat 4.1.30 on the two machines on which MySQL is residing, I did a standard setup with Tomcat running as a service.
Then I installed Apache Http server 2.0.52 on a third machine and started the configuration.
I downloaded mod_jk_apache_1.2.6_2.0.50.dll from (http://mirrors.publicshout.org/apache/jakarta/tomcat-connectors/jk/binaries/win32/) renamed it mod_jk.dll and placed it in the Apache’s ./modules subfolder.
Then I added some lines to the httpd.conf, in order to enable the new module:
# Load mod_jk
#
LoadModule jk_module modules/mod_jk.dll
#
# Configure mod_jk
#
JkWorkersFile conf/workers.properties
JkLogFile logs/mod_jk.log
JkLogLevel info
#
In a few words I told Apache to load the module and to pick up it’s configuration from a file named workers.properties, located in the ./conf folder, to log it’s activity to a file named mod_jk.log in the logs directory and that the log level is “info”.
The lines above were added immediately before the modules section, then, after the line that reads:
# DocumentRoot: The directory out of which you will serve your
# documents. By default, all requests are taken from this directory, but
# symbolic links and aliases may be used to point to other locations.
#
DocumentRoot "C:/Program Files/Apache Group/Apache2/htdocs"
I added other configuration directives for mod_jk:
# Added for load balancing
JkMount /*.jsp loadbalancer
JkMount /servlet/* loadbalancer
JkMount /examples/* loadbalancer
JkMount /*.gif loadbalancer
The above instructions are to make available through mod_jk the root folder (jsp and gif files only) of Tomcat and also the ./servlet and ./examples folders.
I changed the two index.jsp pages of tomcat in order to visually differentiate the servers (red background for 192.168.1.93, yellow background for 192.168.1.144).
The other thing that needs to be done is write a workers.properties, as I told apache to use it:
#
# workers.properties
#
# You should configure your environment slash... ps=\ on NT and / on UNIX
#
ps=\
# list the workers by name
worker.list=tomcat1, tomcat2, loadbalancer
# ------------------------
# First tomcat server
# ------------------------
worker.tomcat1.port=8009
worker.tomcat1.host=localhost
worker.tomcat1.type=ajp13
# Specify the size of the open connection cache.
#worker.tomcat1.cachesize
#
# Specifies the load balance factor when used with
# a load balancing worker.
# Note:
# ----> lbfactor must be > 0
# ----> Low lbfactor means less work done by the worker.
worker.tomcat1.lbfactor=10
# ------------------------
# Second tomcat server
# ------------------------
worker.tomcat2.port=8009
worker.tomcat2.host=192.168.1.144
worker.tomcat2.type=ajp13
# Specify the size of the open connection cache.
#worker.tomcat2.cachesize
#
# Specifies the load balance factor when used with
# a load balancing worker.
# Note:
# ----> lbfactor must be > 0
# ----> Low lbfactor means less work done by the worker.
worker.tomcat2.lbfactor=100
# ------------------------
# Load Balancer worker
# ------------------------
#
# The loadbalancer (type lb) worker performs weighted round-robin
# load balancing with sticky sessions.
# Note:
# ----> If a worker dies, the load balancer will check its state
# once in a while. Until then all work is redirected to peer
# worker.
worker.loadbalancer.type=lb
worker.loadbalancer.balanced_workers=tomcat1, tomcat2
#
# END workers.properties
#
Note that we defined two workers, (named “tomcat1” and “tomcat2”), then specified their properties (port, host, type and lbfactor). After this we defined a load balancer and configured it to balance the two workers defined above.
Comments in the file above explain well how the load balancer works (weighted round robin with sticky sessions, the weight is given by the lbfactor parameter).
A quick test, performed using a browser, shows that load balancing and stickyness of sessions (a session initiated on a server stays on that server until the end) work.
Another nice thing is that a client is transparently redirected to another server in case of failure of the Tomcat it is running on.
This made me think about the chance to save session data on the database and have Tomcat pick them up there, thus giving the system the ability to survive an app server or database server crash.
Session data replication
In order to accomplish this (sessions stored on the database for our application) we need to:
- Create structure to hold data in both instances of MySQL
- Alter the ./conf/server.xml to tell Tomcat to use JDBCStorage
The first step is easily accomplished:
C:\Program Files\MySQL\MySQL Server 4.1\bin>mysql -h 192.168.1.144 -u root -p
Enter password: *******
Welcome to the MySQL monitor. Commands end with ; or \g.
Your MySQL connection id is 13 to server version: 4.1.7-nt-max-log
Type 'help;' or '\h' for help. Type '\c' to clear the buffer.
mysql> create database tomcat_user_auth;
Query OK, 1 row affected (0.04 sec)
mysql> use tomcat_user_auth;
Database changed
mysql> CREATE TABLE `tomcat_sessions` (
-> `session_id` varchar(100) NOT NULL default '',
-> `valid_session` char(1) NOT NULL default '',
-> `max_inactive` int(11) NOT NULL default '0',
-> `last_access` bigint(20) NOT NULL default '0',
-> `app_name` varchar(255) default NULL,
-> `session_data` mediumblob,
-> PRIMARY KEY (`session_id`)
-> ) ENGINE=MyISAM;
Query OK, 0 rows affected (0.12 sec)
mysql>
Modify Tomcat’s standard examples webapp to use MySQL as a persistent sessionstorage manager by adding:
<Manager className="org.apache.catalina.session.PersistentManager" algorithm="MD5" checkInterval="1" debug="10" distributable="false" duplicates="0" entropy="org.apache.catalina.session.PersistentManager@c68a98" maxActive="0" maxActiveSessions="-1" maxIdleBackup="0" maxIdleSwap="0" maxInactiveInterval="1800" minIdleSwap="-1" randomClass="java.security.SecureRandom" saveOnRestart="true" sessionCounter="0">
<Store className="org.apache.catalina.session.JDBCStore" checkInterval="60" connectionURL="jdbc:mysql://localhost/tomcat_user_auth?user=tomcat&password=tomcat" debug="100" driverName="com.mysql.jdbc.Driver" sessionAppCol="app_name" sessionDataCol="session_data" sessionIdCol="session_id" sessionLastAccessedCol="last_access" sessionMaxInactiveCol="max_inactive" sessionTable="tomcat_sessions" sessionValidCol="valid_session"/>
</Manager>
Now restart the whole lot of services (both MySQLs and Tomcats) and test with the sessions servlet in Tomcat’s example webapp.
This is not perfect as the support for a persistent session storage is still in it’s infancy in Tomcat and it’s not a real time storage, parameters like:
checkInterval="1", maxIdleSwap="0", maxIdleBackup="0"
Should keep the sync interval at around 1 second.
Now the system should be set up to:
Receive all requests on “Server 1” with Apache loadbalancing between the two tomcats (“Server 2” and “Server 3”), each connecting to it’s own mysql server (“Server 2” and “Server 3” again) kept in sync by mysql’s replication feature.
In case of failure of one of the backend servers Apache should redirect the user requests to the remaining server and replication should enable session persistence and application integrity.
Application failover, adding some more availabilty to the system
Right now the system can keep track of the session variable, thus a user session can survive the crash of the Tomcat server on which it has been running, but now I want to add more, the ability for an application running on the Tomcats to survive a database crashm by connecting to the other MySQL, which, thanks to replication, should hold an updated copy of the data used by the application.
In this case I’m working on a business intelligence application, in other words an application that mainly reads data loaded by other (external) processes.
The easiest way to add another level of availability to my application is to use … the built in features of MySQL’s JDBC driver!!!!
Infact this driver comes with support for failover, which, by default is read-only, this is not a problem in my application, but it could be in your, so beware and set the appropriate parameter.
The first thing to check and modify is the JDBC URL:
jdbc:mysql://[host][,failoverhost...][:port]/[database][?propertyName1][= …
so, the first thing for us is to specify a failover host, in our case the “other” mysql server, the line will become something like:
jdbc:mysql://192.168.1.93, 192.168.1.144/my_database
now I’ll add more parameters in order to improve the app’s behaviour. The first parameter in the list is enables zlib compression, this should improve performance as I’m sometimes retrieving a huge amount of data, by reducing network load, the result is:
jdbc:mysql://192.168.1.93, 192.168.1.144/my_database?useCompression=true
and then all the parameters related to failover:
autoReconnect=true (the driver will try to reconnect automatically)
maxReconnects=2 (number of tries when autoreconnect is set to true)
initialTimeout=2 (number of seconds to wait between attempts to reconnect)
queriesBeforeRetryMaster=20 (number of queries run on failover server before trying to reconnect to master)
secondsBeforeRetryMaster=40 (number of seconds to wait before tryingto reconnect to master)
The last property sounds a bit strange, the docs state that the server fails to read-only, but there is a documented parameter about having the driver fail over in read/write mode:
failOverReadOnly=false (default is true, in this dual master setup it’s safe to set it to true, even if a Business Intelligence app doesn’t need it)
The connection string has become quite long, another, much more readable, way of setting all those options is to pass them through a java.util.Properties instance and passing it to the DriverManager at connection.
…
Properties properties = new Properties();
properties.put("user", "your_username");
properties.put("password", "your_password");
properties.put("autoReconnect", "true");
…
Connection conn = DriverManager.getConnection(url, properties);
conn.setAutoCommit(true);
…
so far we added another layer of availability to the application, that can now survive a crash of the application server (Tomcat) or of the database server (MySQL).
A simple test can be conducted by stopping second master (in this case MySQL on 192.168.1.144) and using the following jsp, which has the active MySQL server (192.168.1.93) as the failover server.
You’ll see that the output is what expected.
Test.jsp:
<%@ page contentType="text/html; charset=iso-8859-1" language="java" import="java.sql.*, java.util.Properties" errorPage="" %>
<html>
<head>
<title>Test failover page</title>
<meta http-equiv="Content-Type" content="text/html; charset=iso-8859-1">
</head>
<body>
<%
String connectionURL = "jdbc:mysql://192.168.1.144, 192.168.1.93/test";
Properties properties = new Properties();
properties.put("user", "root");
properties.put("password", "");
properties.put("useCompression", "true");
properties.put("autoReconnect", "true");
properties.put("maxReconnects", "2");
properties.put("queriesBeforeRetryMaster", "20");
properties.put("secondsBeforeRetryMaster", "40");
properties.put("failOverReadOnly", "false");
Class.forName("com.mysql.jdbc.Driver").newInstance();
Connection conn = DriverManager.getConnection(connectionURL, properties);
conn.setAutoCommit(true);
PreparedStatement insertStatement = conn.prepareStatement("INSERT INTO testtable (testfield) VALUES ('testvalue')");
insertStatement.executeUpdate();
Statement statement = conn.createStatement();
ResultSet rs = statement.executeQuery("SELECT * FROM testtable");
while (rs.next()) {
out.println(rs.getString("testfield")+"<br>");
}
rs.close();
conn.close();
%>
</body>
</html>
1 comment:
Erik contacted me about this tutorial saying:
"Hi Pablo,
I am trying to set up a persistent store with Tomcat, and I was reading
your pdf on Tomcat High Availability. You mentioned that you set these
parameters:
checkInterval="1", maxIdleSwap="0", maxIdleBackup="0"
to make Tomcat update the session data every 1 or 2 seconds. I have
tried this, and it appears that everything is still only updated the
default 1 minute. Have you ever run across this problem, or do you have
any suggestions as to why these parameters seem to have no effect? ( I
also set maxInactiveInterval to 240 and for some reason it still shows
1800 in the database. !?)
Thank you for any assistance! Your help is greatly appreciated!"
This article is quite old and it has been implemented on Tomcat 4.1.30.
Unless forced to use that version I would suggest to upgrade to Tomcat 5.5. which has native clustering and load balancing.
Post a Comment